Recently I got a chance to configure Devops on premise server. Although installation was not quite difficult but migration form on-premise TFS to Devops was quite challenging.
Creating Build or release pipeline is easy in Azure Dveops but your challenge start if it is on-premise and there is no internet access. (security huh). To successfully build the pipeline with Nuget feed, make sure that nuget.config should
Self hosted Agents
Challenge is to Build Self hosted Agents (compute Power) to build our pipeline. Some tips which may help oters.
Deployment Group : it help when there is no internet on the Devops or org wants their on-premise server or server setup in VMs.
Setting up deployment group is quite simple, below is the link. Just run this power shell command on the server. Normally server should have access or run this deployment group on the same sever where you want to deployed the application.
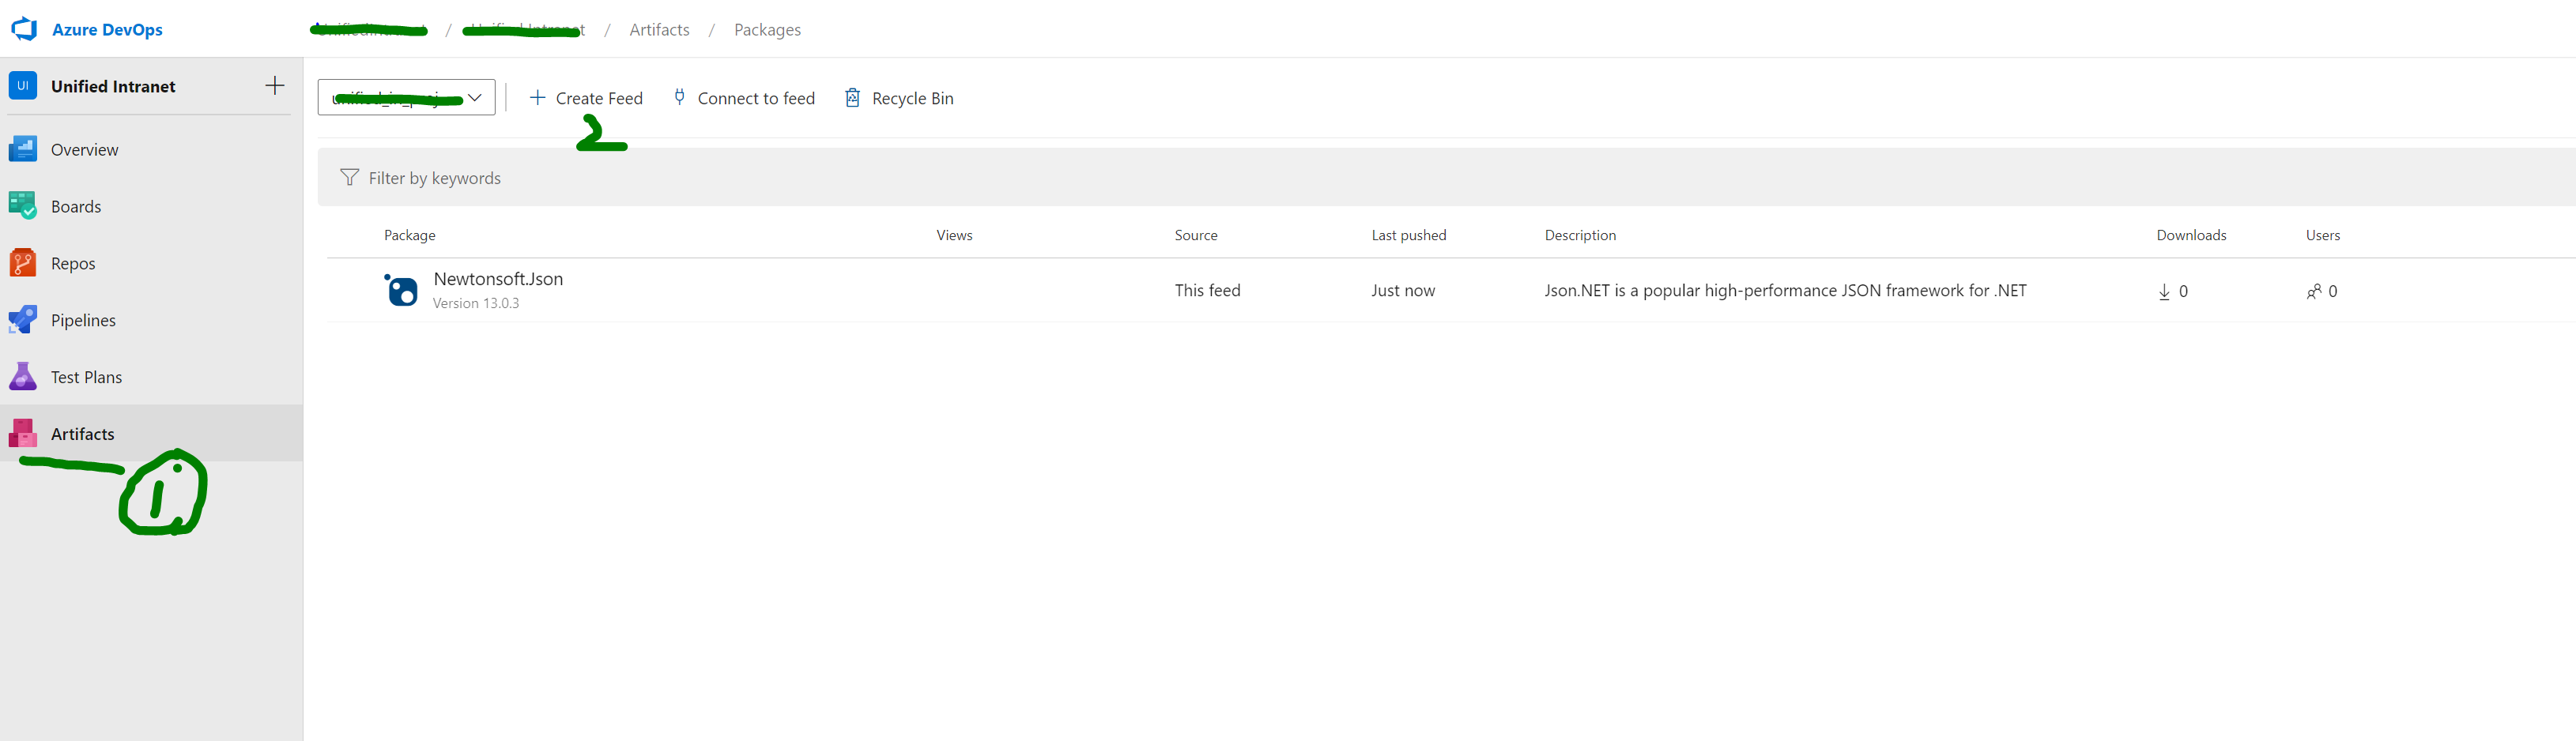
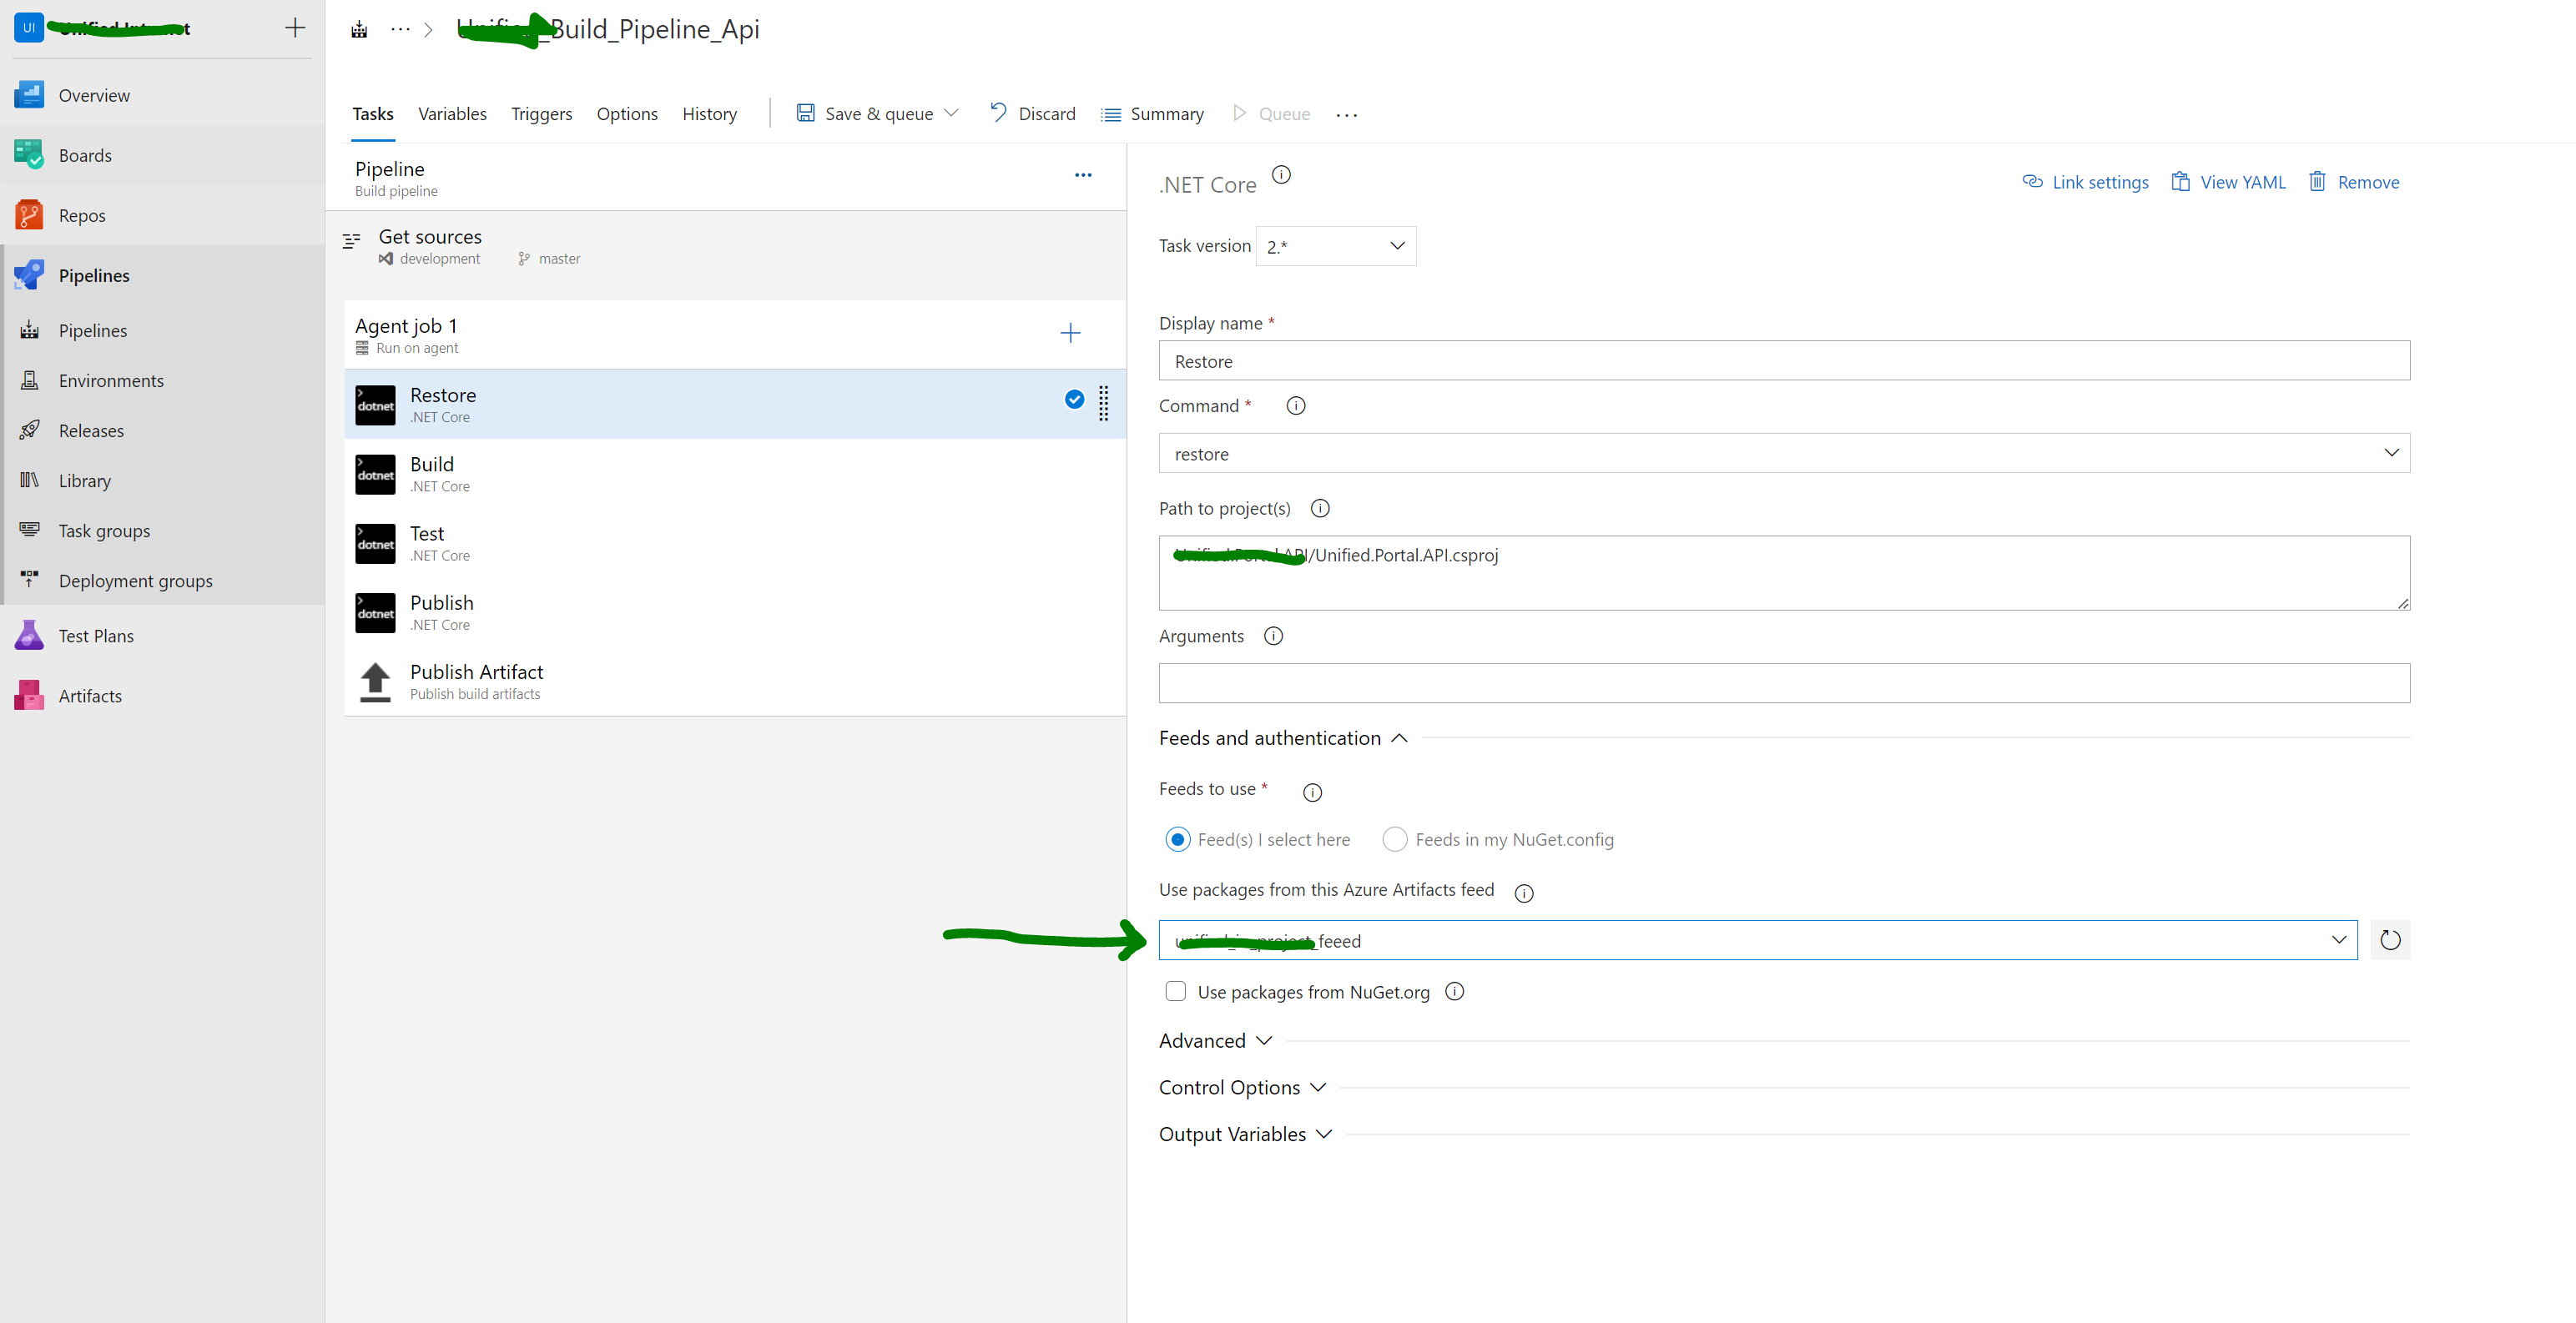
As we dont have acces to nuget.org so our pipeline to restore nuget will fail. So to make all nugets available offline we need to feed to our artifact feed so that pipline will source packages from there.
Add a nuget.config file to your project, in the same folder as your .csproj or .sln file
download nuget.exe in the same folder of solution file. open package manager console and write below commands.
nuget.exe push -Source “myfeed” -ApiKey az packages\refit.7.0.0.nupkg
If you found any error for conflict like below, then you need to remove your upstream. because in our case nuget.org was open thorough firewall rule. so when i try to upload above package i got conflict error form upstream, because mydevops is able to connect to nuget.org. if you got conflict with upstream, then remove the upstream from below screen shot.
Once you add all the dependent packages update your pipline to Feed to use option.
Another way we can also feed package to the project to build by placing packages in the folder in the root directory and use below nueget.config file. By doing below devops will look in to the below package folder to build.
In this blog we will use simple package puppeteer in node js to submit google form. To the point I am pasting the script which works async and sumit 100 Google form in loop.
Create Google Form btw It can be any form
Add Questions in the google form
view the Google form in view state and get the ID or answer as mentioned below
And use below script to click on this label and click submit.
const puppeteer = require(‘puppeteer’);
const timeout = ms=> new Promise(resolve => setTimeout(resolve, ms));
The authentication and authorization module runs in the same sandbox as your application code. When it’s enabled, every incoming HTTP request passes through it before being handled by your application code. This module handles several things for your app:
Authenticates users with the specified provider
Validates, stores, and refreshes tokens
Manages the authenticated session
Injects identity information into request headers
Note
In Linux and containers the authentication and authorization module runs in a separate container, isolated from your application code. Because it does not run in-process, no direct integration with specific language frameworks is possible.
For authenticated requests, App Service also passes along authentication information in the HTTP headers.This option provides more flexibility in handling anonymous requests. It lets you present multiple sign-in providers to your users.
to be continued……
Configure application settings
app settings are variables passed as environment variables to the application code. For Linux apps and custom containers,
f you are using deployment slots you can specify if your setting is swappable or not. In the dialog, you can stick the setting to the current slot.
In a default, or custom, Linux container any nested JSON key structure in the app setting name like ApplicationInsights:InstrumentationKey needs to be configured in App Service as ApplicationInsights__InstrumentationKey for the key name. In other words, any : should be replaced by __ (double underscore).
Map a custom domain to an App Service app using CLI
Sign in to Azure
subscription=”” # add subscription here
az account set -s $subscription # …or use ‘az login’
Create WebApp
Map a custom domain to an App Service app
set -e # exit if error
Variable block
let “randomIdentifier=$RANDOM*$RANDOM” location=”East US” resourceGroup=”msdocs-app-service-rg-$randomIdentifier” tag=”configure-custom-domain-webapp-only.sh” appServicePlan=”msdocs-app-service-plan-$randomIdentifier” webapp=”msdocs-web-app-$randomIdentifier”
Create a resource group.
echo “Creating $resourceGroup in “$location”…” az group create –name $resourceGroup –location “$location” –tag $tag
Create an App Service plan in SHARED tier (minimum required by custom domains).
echo “Creating $appServicePlan” az appservice plan create –name $appServicePlan –resource-group $resourceGroup –sku SHARED
az webapp config hostname add –webapp-name $webappname –resource-group myResourceGroup –hostname $fqdn echo “You can now browse to http://$fqdn”
Data Engineering
The difference between GRS and RA GRS is fairly simple, GRS only allows to be read in the secondary zone in the even of a failover from the primary to secondary while RA GRS allows the option to read in the secondary whenever.
We can use below command to Create web app with git repository
$gitrepo=https://github.com/repo
webappname=mywebappname001
#create a resource group
az group create — – location westeurop – – name myResourcegroupname
#create an app service plan in Free Tier
az appservice plan create – – name $webappname -resource-group myResourcegroupname -sku Free
#create a webapp
az webapp create — – name $webappname -resource-group myResourcegroupname – – plan $webappname
#deploy a code from git repositotry
az webapp deployment source config – – name -resource-group myResourcegroupname – – repo-url $gitrepo -branch master – – manual-integration
In this blog I will walk through how we can deploy SSL for node Js using Open SSL Command. In my case I had to deploy nodejs api on Windows server, I guess for Linux it would be more easier.
note : be careful while creating a resource group. give meaning full name otherwise you will end up with huge numbers of resource group which may confuse you later.
az webapp log tail –name “mywebapp” –resource-group “rglabtestwebapplog” -filter error
Dealing with deploying nodejs application on the windows server we found that linux is much better option with vast and easy capabilities.
With all of other option below are the script which create windows service and run node js app on as server on windows.
Below are the script which create windows services and point out the script to run without any delay.
–Create windows Service
var Service = require(‘node-windows’).Service;
// Create a new service object
var svc = new Service({
name:’Hello World’,
description: ‘The nodejs.org example web server.’,
script: ‘D:\\mysolution\\src\\index.js’
});
// Listen for the “install” event, which indicates the
// process is available as a service.
svc.on(‘install’,function(){
svc.start();
});
svc.install();
—————— Below snippet is to remove the service.
var Service = require(‘node-windows’).Service;
// Create a new service object
var svc = new Service({
name:’Hello World’,
script: require(‘path’).join(__dirname,’src\\index.js’)
});
// Listen for the “uninstall” event so we know when it’s done.
svc.on(‘uninstall’,function(){
console.log(‘Uninstall complete.’);
console.log(‘The service exists: ‘,svc.exists);
});
// Uninstall the service.
svc.uninstall();
In the end , my personal opinion is linux is best option when dealing with nodej applications.